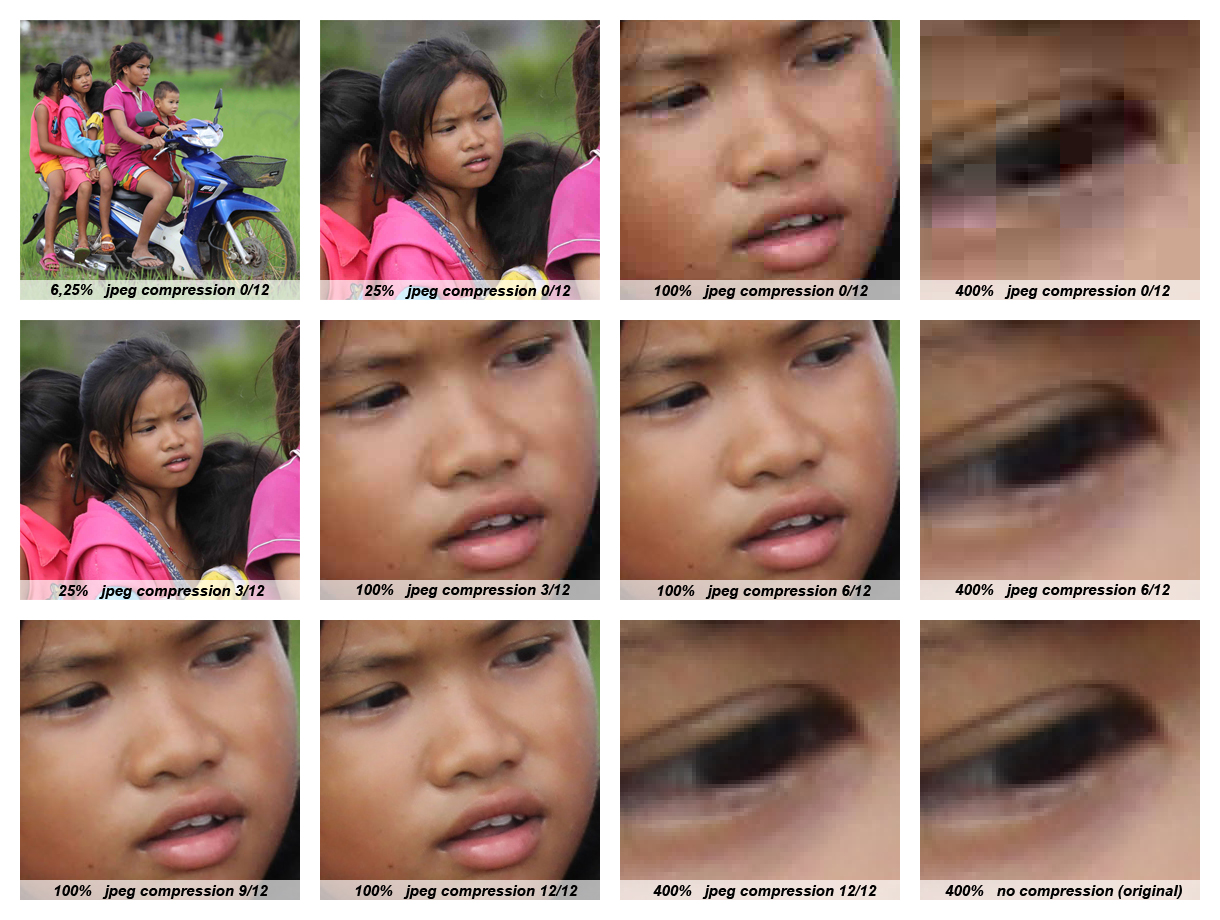
“Compress an image without losing quality” can mean two different things. If no represented information may be discarded, you need lossless compression. If the goal is a much smaller file with no meaningful visible degradation at the intended display size, carefully tuned lossy compression can be far more effective.
For Web delivery, the second interpretation is often the useful one. A photograph displayed at 1,200 pixels wide rarely needs every bit of a multi-thousand-pixel camera original, while a screenshot containing tiny text may react badly to aggressive lossy encoding.
The right question is not “which compression percentage should I use?” but “what is the smallest representation that preserves everything the user actually needs?”
The six-step method
- Preserve the master. 2. Resize to useful dimensions. 3. Choose a format suited to the content. 4. Lower quality progressively. 5. Inspect the areas where artifacts appear first. 6. Measure the real byte savings and stop when further degradation is not worth it.
Compression and resizing: what is the difference?
Resizing changes the number of pixels. Compression changes how efficiently those pixels are encoded, and lossy compression may alter them. A complete optimization workflow often does both. Read What Image Resolution Should You Choose? before pushing an encoder too hard.
Why does an uncompressed image take so much space?
A 4,000 × 3,000 RGB image contains 12 million pixels. At three 8-bit channels, a simple raw representation already needs roughly 36 MB before additional information. Compression exploits redundancy so the stored file can be far smaller.
What is lossless compression?
Lossless compression lets the encoded image data be reconstructed without losing represented pixel information. PNG is a familiar example. Lossless does not mean the file is small; photographs can remain large because their pixel patterns are complex.
Does lossless mean absolutely nothing changed?
Only relative to the data entering that encoding stage. If an image was resized, quantized, color-converted, or stripped of metadata first, those earlier transformations may already have changed it. A lossless PNG export does not magically restore the original camera data.
What is lossy compression?
Lossy compression deliberately discards or approximates information to reduce file size. JPEG, lossy WebP, and common AVIF workflows can do this. The objective is not mathematical identity but acceptable visual fidelity for the intended use.
Human vision is more sensitive to some structures than others. Image codecs exploit spatial redundancy and perceptual characteristics so less important detail can be represented more coarsely. The exact strategy depends on the codec.
Step 1: always keep an original
Never make the only copy of an important image your compressed Web derivative. Keep the highest-quality master separately. That gives you a clean source when future layouts need new sizes or better codecs.
What is generational loss?
If you decode a lossy image and save it again with lossy compression, the second encoder works from data that has already been altered. Repeating this process can accumulate artifacts. Generate each derivative from the master whenever possible.
Step 2: resize before compressing
If a 4,032-pixel photo is displayed at no more than 1,200 pixels, reduce its dimensions before obsessing over quality settings. Removing unnecessary pixels is often the largest and most predictable saving.
Does resizing lose quality?
Downscaling removes pixels, so information is technically discarded. But if those pixels could never be displayed usefully in the target context, the visible result can remain excellent. The question is fitness for purpose, not mathematical identity.
Resizing or cropping?
Resizing preserves the composition while changing its dimensions. Cropping removes part of the frame. Do not crop merely to reduce bytes unless the composition is intentionally changing.
Different formats respond differently to content. Compare PNG, JPEG, WebP, and AVIF first, then tune the encoder. A quality value of 80 in one codec is not equivalent to 80 in another.
JPEG, WebP, and AVIF are the main candidates. Start from the same resized master, encode each at a visually comparable quality, and keep the option that best fits your browser and production constraints.
PNG or lossless WebP often preserve small text and sharp UI edges best. Lossy formats can work for photographic screenshots, but inspect characters, thin lines, and high-contrast edges closely.
If the artwork is vector, use SVG. For raster-only assets, PNG or lossless WebP may be appropriate, especially with transparency.
Step 4: lower quality progressively
Start from a high-quality encode, reduce the setting in steps, and compare. Once artifacts become visible or important detail disappears, move back to the last acceptable setting. This is more reliable than applying one universal number.
Why doesn’t ‘quality 80’ mean 80% of the original?
Quality sliders are encoder-specific controls, not standardized percentages of retained information. 80 in JPEG, WebP, or another tool can represent very different algorithms and results.
Can the same quality be used for every image?
No. A portrait, foliage, night photograph, diagram, and screenshot expose different weaknesses. Automations can use defaults, but representative visual checks are still necessary.
Step 5: know where to look for artifacts
Inspect high-contrast edges, fine hair, foliage, text, gradients, skin, repeated patterns, and transparent boundaries. These regions often reveal blocking, ringing, smearing, banding, or color changes before broad flat areas do.
Why also inspect the image at final size?
A defect visible at 800% zoom may be irrelevant when the image is displayed at 600 CSS pixels. Zoom helps diagnose; final-size viewing decides whether the trade-off is acceptable.
Can quality be measured objectively?
Metrics such as PSNR, SSIM, and perceptual models can help compare encodes, especially in automated pipelines. But no single metric perfectly predicts human judgment for every image. Use metrics as evidence, not as a replacement for visual validation.
Step 6: measure the real saving
Record the original and final byte sizes. A quality reduction that saves 2 KB while visibly damaging a hero image is a poor trade. A visually invisible change that removes hundreds of kilobytes is valuable.
Why can a few kilobytes matter?
On one image, the difference may be trivial. Across dozens of assets, repeated page views, slow networks, and mobile devices, small savings accumulate. Prioritize the largest and most frequently loaded resources first.
Is file size on disk the transferred size?
Usually the image resource is transferred as its encoded file bytes, but HTTP compression, caching, CDN transformations, headers, and network behavior complicate the full page cost. Measure with browser developer tools in the deployed environment.
Compression and responsive images
Do not force one highly compressed giant file to serve every viewport. Generate several widths and let the browser choose with srcset and sizes. See Responsive Images.
Compression and Retina screens
High-density screens can benefit from more source pixels, but that does not justify maximum resolution for everyone. Provide sensible candidates and allow browser selection.
Compression and LCP
If the Largest Contentful Paint element is an image, reducing its transfer size can improve load performance. But preload/priority, server latency, responsive selection, and rendering also affect LCP.
Compression and CLS
Compression itself does not solve layout shift. Declare image dimensions or an aspect ratio so the browser can reserve space before the file finishes loading.
Metadata are separate from pixel compression, but they contribute to total file size. EXIF, XMP, thumbnails, and profiles may be removable from public derivatives when they are unnecessary.
No. Orientation, rights information, and color profiles can be useful. Privacy-sensitive GPS data may be undesirable. Inspect first with the image metadata reader.
Is an ICC profile useless weight?
Not necessarily. Profiles help maintain predictable color. Removing them without understanding the workflow can change appearance. Standardize color intentionally rather than stripping bytes blindly.
Compression and transparency
Transparent images add alpha information and can reveal edge artifacts when encoded or resized poorly. Test the final asset over the real backgrounds it will use.
Why do halos sometimes appear around cut-out objects?
Hidden RGB values in transparent pixels, premultiplied-alpha handling, resampling, and lossy encoding can contaminate edges. Inspect transparent boundaries over both light and dark surfaces.
Compressing an image containing text
Favor exact or near-exact edge preservation. Resize carefully and avoid aggressive chroma or lossy artifacts. Often PNG or lossless WebP is a better starting point than a heavily compressed JPEG.
Compressing a photograph
Resize first, then compare JPEG, WebP, and AVIF. Evaluate faces, gradients, texture, foliage, and fine detail at final display size.
Compressing an illustration
The best method depends on whether the illustration is vector, flat-color raster, or textured raster. SVG may be ideal for geometry; lossless raster formats can excel on flat graphics; modern lossy codecs can suit painterly work.
Compressing an SVG
SVG optimization is different: simplify markup, remove unnecessary metadata, reduce excessive numeric precision, and reuse definitions. See Optimizing SVG Without Changing Its Appearance.
Why can PNG become larger after ‘compression’?
A tool may change color type, palette use, metadata, filtering, or dimensions. “Optimize” is not guaranteed to produce a smaller file. Always compare outputs.
Why can WebP be larger than JPEG?
The WebP may be lossless while the JPEG is lossy, quality targets may differ, or encoder settings may be poor. Compare like with like.
Why isn’t AVIF a magic solution?
AVIF can be excellent, but some images gain little, encoding can be slower, and aggressive settings can create unpleasant artifacts. A modern codec does not remove the need for testing.
Can compression be automated?
Yes. Build pipelines can resize, encode multiple formats, set defaults, strip selected metadata, and enforce budgets. Automation should preserve masters and allow exceptions for assets that fail visual checks.
Should you set a maximum file size per image?
Budgets are useful, but a single hard limit can be crude. A 1,600-pixel hero and a 64-pixel avatar should not have the same budget. Set limits by role and dimensions.
Can you set an image budget per page?
Yes. A page-level budget encourages teams to think about the combined cost of hero images, cards, avatars, and decorative assets. It also helps prevent many individually ‘small’ files from becoming a heavy page.
Lazy loading and compression: same problem?
No. Compression reduces resource size. Lazy loading changes when a resource is requested. Use both appropriately, and do not lazy-load a critical above-the-fold LCP image merely because lazy loading exists.
Caching and compression
Good caching prevents unchanged images from being transferred repeatedly. Compression and caching solve different layers of performance and should be used together.
Image CDNs can generate widths, formats, and quality variants dynamically. This can simplify delivery but introduces provider behavior, URLs, cache keys, cost, and operational dependency. Keep source ownership clear.
Local compression and privacy
Browser-side tools can resize or re-encode images without uploading them, which is valuable for private material. Local processing also avoids server transfer, though device performance and browser codec support set practical limits.
Compression and colors
Lossy encoding can subtly change colors, especially around edges or in chroma detail. For brand-critical assets, compare the final output rather than assuming color values are untouched.
Compression and WCAG contrast
If text or meaningful graphics are embedded in an image, compression artifacts can reduce effective readability. Validate the final encoded image and see WCAG Contrast.
How do you compare two versions properly?
Use identical dimensions and the same source. Compare side by side at final size, then zoom into sensitive regions. Record byte size. If possible, blind the file labels so preference is not biased by knowing which codec is newer.
Example: hero photograph
Resize to the maximum useful responsive candidate, encode JPEG/WebP/AVIF variants, and compare. A hero often deserves slightly more quality than a tiny thumbnail because it is visually prominent.
Example: documentation screenshot
Preserve small text and thin lines. PNG or lossless WebP may beat a lossy photograph-oriented setting even when the byte count is somewhat larger.
Example: card thumbnail
Aggressive dimension reduction often produces the biggest win. Once the thumbnail is close to its real slot size, moderate lossy compression can usually save more without obvious damage.
Example: transparent logo
Prefer SVG if the source is vector. Otherwise compare PNG and lossless WebP, inspect alpha edges on light and dark backgrounds, and avoid repeated resampling.
Can compression increase file size?
Yes. Re-encoding with a different codec, lossless mode, extra metadata, or inefficient settings can produce a larger file. Never assume an optimization tool improved the asset without measuring.
When should you stop optimizing?
Stop when additional savings are small relative to visible degradation, engineering time, or pipeline complexity. Optimization is an economic trade-off, not a contest to reach the smallest possible number.
Checklist before publishing
Keep the master; verify dimensions; preserve aspect ratio; choose format intentionally; inspect final quality; check transparency; inspect metadata; create responsive variants; declare dimensions; measure transfer size; and verify the image in the real page.
The most common mistakes
Avoid compressing before resizing, overwriting the only master, re-encoding lossy files repeatedly, trusting one universal quality number, comparing codecs at unequal visual quality, stripping all metadata blindly, and judging only at extreme zoom.
Build a repeatable compression policy
A mature project should not depend on somebody remembering the right export settings for every image. Define a small policy by image role. A hero photograph, article illustration, card thumbnail, screenshot, avatar, and logo can each have expected maximum dimensions, preferred formats, and approximate byte budgets.
The policy should remain flexible. A complex hero may legitimately exceed its normal budget if a lower setting destroys important detail. Conversely, a simple photograph may compress far below the budget. The purpose of a budget is to trigger review, not to reward blindly reaching a number.
Keep the policy close to the build process. If possible, generate derivatives from masters automatically, record their dimensions and sizes, and fail or warn when an asset is obviously oversized. This catches a 6,000-pixel upload before it becomes a performance regression.
Why visual comparison needs a consistent method
Human comparison becomes unreliable when one version is shown larger, against a different background, or after browser scaling. Compare candidates at identical rendered dimensions and under the same conditions. For transparent assets, test at least one light and one dark background.
First view the whole image at its intended size. Ask whether the difference is visible without hunting for it. Then zoom into known stress areas to understand what the codec changed. If an artifact is visible only at extreme zoom and has no effect in the product, the smaller file may still be the better delivery choice.
For a set of similar assets, establish a reference group. If your chosen defaults work well on portraits, foliage, gradients, screenshots, night scenes, and illustrations, they are more likely to be robust. Continue allowing per-image exceptions.
Compression in a responsive pipeline
Responsive delivery multiplies the number of encoded files, so consistency matters. A single photograph may produce widths of 480, 800, 1,200, and 1,600 pixels in WebP and AVIF. That does not mean every variant should use exactly the same encoder setting.
Small variants sometimes tolerate stronger compression because fine detail is no longer visible at their final size. Large hero candidates may deserve more quality. Automated systems can use role-aware defaults, but should avoid producing dozens of nearly redundant widths.
The browser’s selection logic only helps if sizes describes the real layout. A beautifully compressed 1,600-pixel file is still wasteful when incorrect markup causes it to be selected for a 320-pixel slot. Compression and responsive markup must therefore be tested together.
Protecting source quality over time
One of the most damaging long-term mistakes is losing track of the master. If editors download an already compressed Web image, crop it, save it again, and later use that result as the new source, generational loss becomes part of the editorial workflow.
Keep masters in a clearly separate location and make derivatives disposable. Ideally, every public asset can be regenerated from a source plus reproducible transformation settings. This makes future codec changes, new breakpoints, and design updates much safer.
For photographs, preserve the original capture or a high-quality edited master. For illustrations, preserve the editable source. For SVG, keep the designer’s master separately from the optimized delivery copy. The public file should be treated as an output, not as the only surviving source.
A final rule for editorial teams
When an editor is unsure, the safest sequence is simple: never overwrite the master, resize a copy to the real use case, export it in the project’s preferred format, and inspect the result before publishing. If the file still feels heavy, reduce quality gradually rather than jumping to an extreme setting. Record unusual exceptions so the next person understands why an asset differs from the default pipeline.
This habit is more valuable than memorizing a single quality number. Image optimization changes as codecs, browsers, and layouts evolve, while the underlying method remains stable: preserve source quality, remove data the page cannot use, measure the result, and keep only trade-offs that are visually acceptable.
What to remember
The largest gains usually come from the right dimensions, then the right format, then carefully tuned quality. Lossless preserves represented pixel data; lossy trades some information for size. Keep a master, compare visually, measure bytes, and optimize for the actual display context.
Resize before you squeeze the codec
A modern phone photograph can easily be more than 4,000 pixels wide. If the largest slot on the site is around 1,200 pixels, keeping every source pixel in that delivery file is usually unnecessary. Resize first, then tune the codec. On high-density displays you may need a larger candidate than the CSS display width, but that does not mean every visitor should receive the 4,000-pixel original. Generate several widths and let responsive-image markup select an appropriate resource.
Resizing does remove information, but that can be exactly the right loss. A 300-pixel card thumbnail does not need the detail required for a 2,000-pixel zoom view. The important rule is to derive every delivery size from the master rather than enlarging a thumbnail later.
Cropping is different from resizing. Resizing keeps the full frame and changes its dimensions; cropping removes part of the composition. A useful crop can remove irrelevant background and therefore reduce the amount of visual information that must be encoded, but it is an editorial decision rather than a compression trick.
The format can matter more than a small change to the quality slider. A photograph stored as PNG can remain unnecessarily large because PNG preserves the encoded pixels losslessly. The same photo may be far smaller as JPEG, WebP, or AVIF with controlled lossy compression. Conversely, a screenshot with tiny text, hard edges, and flat colors can look worse after aggressive photographic compression.
For photographs, compare JPEG, WebP, and optionally AVIF at the same pixel dimensions. For screenshots, start with PNG or WebP and inspect text and borders carefully. For a logo or geometric illustration, ask whether the source should remain vector rather than being rasterized at all. If an SVG source exists, optimize the SVG instead of converting it just to use a raster compressor.
Quality values are not universal percentages. “80” in one JPEG encoder is not equivalent to “80” in a WebP encoder, and neither means that 80 percent of the original information is retained. Treat the number as an encoder control. Export, measure, compare, and stop when the next reduction in bytes is no longer worth the visible degradation.
Where compression artifacts appear first
Artifacts are easier to spot in some areas than others. Hair, foliage, fabric, grass, brickwork, and other irregular textures can become mushy. Smooth skies and gradients can reveal banding. High-contrast edges can develop halos. Small text can blur or acquire ringing. Skin can look unnaturally smoothed or structured.
Inspect difficult areas at 100 percent, but also judge the image at the size at which users will actually see it. A difference that is obvious at 400 percent may be irrelevant in a 320-pixel thumbnail. The opposite can also happen: a preview that looks acceptable when small may look poor when the image becomes a full-width hero.
Objective metrics such as PSNR or SSIM can help with automated comparisons and regression testing, but they are not a complete substitute for visual review. A mathematically small error around a face, logo, or line of text can matter more than a larger error in an unimportant texture.
Measure the useful saving, not the smallest possible file
A simple reduction calculation is:
reduction (%) = (original size - final size) / original size × 100
Going from 500 KB to 200 KB is a 60 percent reduction. But a 500 KB to 80 KB export with obvious artifacts can be a worse result than a 140 KB version that looks effectively identical in context. The target is the smallest acceptable file, not the smallest file an encoder can produce.
Small savings can add up across a gallery or card grid. Saving 20 KB on 30 thumbnails removes roughly 600 KB from the page. At the same time, spending an hour to save 2 KB on a rarely loaded image is not a sensible optimization priority. Think in terms of page budgets and user impact, not just isolated file percentages.
Responsive delivery, Retina displays, LCP, and CLS
Compression answers “how small can this particular file be?” Responsive images answer “which file should this browser download?” A perfectly compressed 2,000-pixel hero is still wasteful on a device that only needs a 640- or 960-pixel candidate. A practical pipeline may create widths such as 640, 960, 1,280, and 1,920 pixels and expose them through srcset and sizes.
High-density screens do not justify sending the maximum candidate to everyone. Browser selection can combine layout width and device density to choose a source with enough pixels without defaulting to the largest asset.
A hero image can also become the page’s Largest Contentful Paint element. Reducing bytes helps, but LCP also depends on discovery, priority, server response, caching, and whether the browser requested the right candidate. Likewise, compression does not solve Cumulative Layout Shift. Reserve image space with correct width, height, or an aspect ratio so the page does not jump while the resource loads.
EXIF, XMP, GPS coordinates, embedded thumbnails, rights information, and color profiles are not the same thing as pixel compression. Removing unnecessary metadata can reduce a file and improve privacy, but some metadata is useful or important. Do not strip everything blindly. Review what must stay in the file, what belongs in the CMS, and what should be removed before public delivery.
An ICC profile is not automatically wasted bytes: it can affect color interpretation. That matters for photography, product imagery, artwork, and brand colors. Compression itself can also alter subtle colors and gradients, so a strongly compressed image is a poor reference if you later intend to extract an exact palette from it.
Transparency adds another constraint. PNG, WebP, and AVIF can carry alpha; classic JPEG cannot. Converting a transparent asset to JPEG requires compositing it against a background and can reveal fringes around cut-out objects. Test transparent images on light, dark, and saturated backgrounds to expose edge problems.
Special cases: text, photos, illustrations, and SVG
For screenshots and documentation containing small text, prefer readability over a few additional kilobytes. Try PNG, lossless WebP, or a high-quality lossy setting and zoom into the characters before deciding.
For photographs, resize first, then compare JPEG, WebP, and AVIF from the same master and at the same dimensions. A portrait on a smooth background and a dense forest may need very different settings.
For illustrations, identify the actual visual structure. Flat-color artwork often works well losslessly. Textured illustrations may benefit from modern lossy formats. Vector artwork should usually remain SVG. SVG optimization removes unnecessary markup, metadata, precision, and editor data rather than applying photographic compression.
A re-encode can even make a file larger. A source may already be well optimized, the new codec may be poorly suited to the content, or the tool may add metadata. A serious pipeline therefore compares before and after and never replaces a smaller asset automatically without a functional reason.
Automation and sensible budgets
Compression is a good candidate for automation when a site contains many images. A build pipeline can start from a master, generate the required widths, encode approved formats, apply quality settings, enforce metadata policy, and report sizes. Add guardrails: preserve the source, reject outputs that are larger for no reason, flag unusually heavy assets, and allow exceptions for sensitive images.
A single universal size limit is rarely useful. An icon, card thumbnail, hero image, and gallery photograph have different jobs. Define budgets by category and also watch the total image budget of a page. Twenty individually reasonable files can still create a slow page.
Caching and CDNs complement compression rather than replacing it. Cache reduces repeated transfers; compression reduces the bytes in each transfer. An image CDN can resize and encode on demand, while a static site may generate variants at build time. Choose the system whose cost, reliability, cache behavior, and maintenance burden fit the project.
Frequently asked questions
Can I compress without any loss? Yes, with lossless compression, though savings may be smaller.
Is quality 80 always safe? No; quality scales are not universal.
Should I resize first? Usually yes when dimensions exceed real needs.
Which format is smallest? It depends on content and settings.
Should I remove EXIF? Remove unnecessary or sensitive metadata intentionally, not blindly.
Does compression fix CLS? No; declare dimensions or aspect ratio.
Can browser tools process locally? Yes, many resizing and encoding workflows can run client-side.